
Plenty of tile sold as porcelain is really ceramic, and the two look identical on a shelf. Guess wrong in a wet room and the floor can crack or soak up water. These five checks verify porcelain tile before you buy.
Key takeaways
- Real porcelain absorbs 0.5% water or less under the ANSI A137.1 tile standard; above that line it is ceramic, no matter what the label says.
- The PTCA (Porcelain Tile Certification Agency) mark is the only third-party proof a tile is genuine porcelain, look for it on the box or the maker's site.
- Through-body color that runs the full thickness of the tile is a strong porcelain sign; a thin glazed top over a pale clay body often means ceramic.
- Match the PEI wear rating to the room: PEI 3 or higher for floors, PEI 4-5 for busy entryways and heavy use.
- For wet floors, want a DCOF slip number of 0.42 or higher (ANSI A326.3) before you buy.
Why "Porcelain" on the Label Doesn't Always Mean Porcelain
The word "porcelain" on a box is not a promise. One number is, and it is the water-absorption rating.
Tile sold as porcelain that is actually ceramic can soak up water, crack, and fail outdoors or in a wet bathroom. When that happens after the floor is down, the installer usually eats the fix, not the store that mislabeled the box.
One line settles it. According to the Tile Council of North America (TCNA), whose FAQ on porcelain vs. non-porcelain tile lays out the dividing line, real porcelain absorbs 0.5% water or less under the ANSI A137.1 tile standard (ANSI is the American National Standards Institute, the group that sets product specs in the US). Anything above that line is ceramic, whatever the sticker says.
That measure has a trade name: vitreous. Vitreous just means how much water a fired tile soaks up, which is exactly what sorts porcelain from ceramic. The denser and glassier the fired body, the less it drinks.
No store clerk's word counts here. Only the water-absorption number and a third-party certification mark do. The five checks below walk you through both, plus the hands-on tells you can run on a sample yourself.
| Tile type | Water absorbed |
|---|---|
| Porcelain (impervious) | 0% to 0.5% |
| Vitreous ceramic | 0.5% to 3% |
| Semi-vitreous ceramic | 3% to 7% |
Water absorption by tile class under ANSI A137.1; the 0.5% line is what separates porcelain from ceramic. The bars above are drawn to scale with the percentages shown.
Step 1: Read the Water-Absorption Number on the Spec Sheet
Start here, because this number alone can confirm or kill a "porcelain" claim. Find it on the product spec sheet, the box, or the maker's website, listed as the ANSI A137.1 water-absorption result.
The pass line is simple. 0.5% or lower is porcelain. Higher is ceramic. There's no gray area and no rounding in your favor.
If a seller can't produce that number, treat the tile as unverified and move on. A brand making real porcelain publishes it, because that figure is the whole selling point.
Watch for marketing dodges too. Phrases like "porcelain-look," "porcelain-grade," or "porcelain finish" carry no number behind them. They're describing a look, not the fired body, and none of them clears the 0.5% bar on their own.
Step 2: Look for the PTCA Certification Mark
The one piece of third-party proof is the PTCA mark. According to the Tile Council of North America (TCNA), PTCA stands for the Porcelain Tile Certification Agency, an independent group backed by the CTDA (Ceramic Tile Distributors Association) and the TCNA that tests tile and certifies which ones are genuine porcelain.
Look for it in two places. One is a small stamped logo on the carton. The other is a certified-product listing on the maker's site or on PTCA's own site, which you can search by brand and product name.
A company selling true porcelain has every reason to show the mark, since it costs them nothing and proves their claim. So when a box says "porcelain" but carries no certification anywhere, that gap is your cue to ask harder questions and lean on Step 1's number.
Step 3: Check for Through-Body Color, Not Just a Glazed Top
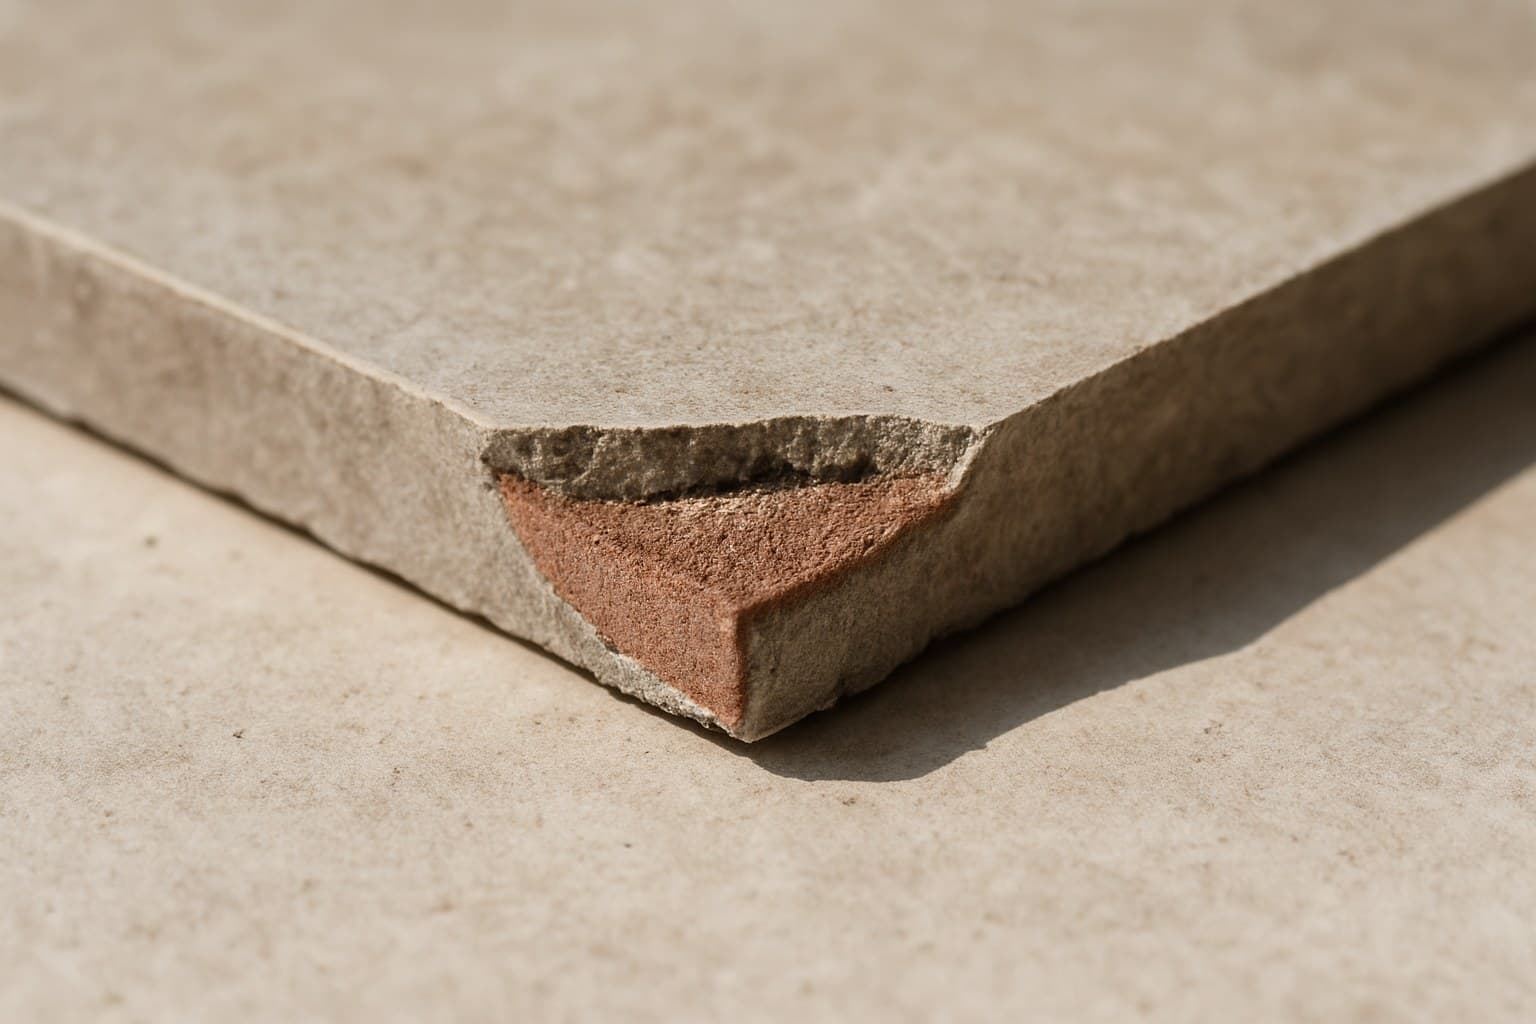
Through-body color means the same color runs all the way through the tile, top to bottom, instead of sitting in a thin painted glaze on the surface. It's one of the clearest signs you're holding dense porcelain.
The tell is on a cut edge or a broken corner. True through-body porcelain matches from face to back, the same shade the whole way down. Many ceramics give themselves away with a pale, chalky clay body hiding under a thin colored skin.
Be fair about the limit, though. Glazed porcelain is a real product too, with color on top of a porcelain body. So through-body is strong supporting evidence, not final proof by itself. Pair what you see on the edge with the number from Step 1 and the mark from Step 2.
Step 4: Test the Sample Yourself Before You Commit
Buy one sample first, then run a few quick checks before you order the whole floor. The best one is the water-drop test. Put a few drops of water on the raw, unglazed back of the sample and wait a minute. Porcelain beads the water and barely darkens. A thirsty ceramic drinks it in and leaves a dark wet mark.
Your hands tell you more. Porcelain is denser, so a piece feels heavy for its size. Give it a light tap and it rings cleaner and brighter, where a lighter ceramic gives a dull thud. Check the cut edge too, and make sure it matches the face.
Set your expectations straight. These are rough, on-the-spot checks, not lab proof. They point you in the right direction, but you still confirm the water-absorption number from Step 1 before you commit.
In the floors I've done around Dayton, the cheap mislabeled stuff gives itself away at the wet saw. It chips and powders at the cut line, while true porcelain slices clean with a crisp edge. If a "porcelain" tile crumbles under the blade, trust the saw over the box.
Step 5: Match the PEI and Slip Ratings to Your Room
Once you know it's real porcelain, match it to the room. PEI stands for Porcelain Enamel Institute, the industry group behind this wear-rating scale. The PEI rating runs 1 to 5 and tells you how much foot traffic a tile's surface can take before it starts to dull and scratch.
| PEI class | Traffic it takes | Best for |
|---|---|---|
| PEI 1 | No foot traffic | Walls only |
| PEI 2 | Light | Low-use guest bathrooms |
| PEI 3 | Moderate | Most home floors, kitchens, baths |
| PEI 4 | Heavy | Entryways, mudrooms, light commercial |
| PEI 5 | Heaviest | Stores and commercial floors |
Source: the PEI floor-wear rating scale
PEI wear classes and the rooms each one suits. Most home floors are fine at PEI 3; busy entries want PEI 4-5.
Walls can take PEI 1-2 since nobody walks on them. Most home floors want PEI 3. Busy entryways and mudrooms that catch grit and wet boots want PEI 4-5.
Slip matters in wet rooms. On bathroom and entry floors, look for a DCOF slip number of 0.42 or higher. DCOF stands for dynamic coefficient of friction, a grip rating set by the ANSI A326.3 standard, and 0.42 is the floor level that standard calls out for level interior floors expected to get wet. Some lines build grip into the surface on purpose, such as MSI's ZeroSlip texture, which is one example of a slip-focused option within a product range. Mosaic tile is another option worth a look here, since its many small pieces and extra grout lines add natural traction underfoot, a tradeoff mosaic floor tile guide explains in more detail.
For the deeper, room-by-room call on finishes, grout, and layout in a wet space, see bathroom tile ideas guide so this page stays focused on verifying the tile itself. Natural stone is one of those finish choices that comes with its own sealing and slip considerations, which stone bathroom tiles guide covers for anyone drawn to that look.
Porcelain vs Ceramic: What Actually Differs
Ceramic is fine for dry walls and light-use floors and it saves money. For wet rooms, outdoors, and heavy traffic, porcelain's lower water absorption earns its higher price.
| Feature | Porcelain | Ceramic |
|---|---|---|
| Water absorption | 0.5% or less | Above 0.5%, often 3%+ |
| Density | Denser, heavier | Lighter, more porous |
| Color | Often through-body | Usually glazed top over pale body |
| Materials cost | Roughly $3 to $10 per sq ft | Roughly $0.50 to $7 per sq ft |
| Best for | Wet rooms, outdoors, heavy traffic | Dry walls, light-use floors |
| DIY cutting | Harder, needs a wet saw | Easier to score and snap |
Porcelain and ceramic compared on the points that decide where each belongs; costs are materials only, before labor, and vary by market and product line.
On cost, split it before you budget. The materials prices above are per square foot only and vary by region and brand. Labor runs roughly $5 to $12 per sq ft for porcelain and $4 to $8 per sq ft for ceramic, since porcelain is harder and slower to cut and usually needs a wet saw. Tight, cut-heavy spaces push the per-foot labor up too, so a small bathroom or a run of stairs costs more per square foot than one wide open room.
If you're really weighing tile against a vinyl floor rather than against ceramic, that's a different question with its own math, and LVP vs tile comparison works through the cost and wear side by side. A lot of that vinyl now comes in click-lock planks that snap together without adhesive, and click-lock tile flooring guide walks through how that installation differs from glue-down LVP (luxury vinyl plank).
Stone-Look and Large-Format Porcelain: What You're Really Buying
Stone-look porcelain copies marble, limestone, and travertine with a printed and textured surface. The appeal is that you skip the sealing and staining headaches of real stone, and freeze-thaw-rated versions hold up outdoors where natural stone can spall. If you still want the real thing, our stone flooring guide ranks the natural options by cost, upkeep, and slip risk so you can compare honestly. Porcelain comes in wood-look planks just as convincingly, and wood-look tile guide breaks down how that finish compares to the real board.
Large-format porcelain, the big sheets and long planks, changes the install more than the look. Those pieces need a very flat subfloor, because any dip shows up as lippage, where one tile edge sits higher than its neighbor and you feel the ridge underfoot. That means a flatness check and a moisture check on the slab before anything gets set, not after.
This is also where I draw the DIY line. A handful of standard porcelain tiles in a small bath is a reasonable weekend job for a careful homeowner with a rented wet saw. Large-format sheets, mortar beds that have to be dead flat, and stair nosings are where I tell people to hire it out. The tiles are expensive, they crack when they flex over a hollow, and the leveling is the part pros earn their money on.