The peeling and hot-tire pickup you're scared of almost never start in the coating. They start in the slab. An epoxy floor can stay showroom-clean for years or lift in one summer, and the resin you picked rarely decides which. Here's how to read the concrete before you spend a dime.
Key takeaways
- An epoxy floor only lasts as long as its prep: most peeling, seam lift, and hot-tire pickup trace back to a slick, damp, or untested slab, not the product you bought.
- Coating systems run thin (a few mils), slurries thicker, and mortars thickest (up to 250+ mils) for industrial abuse; a home garage almost never needs more than a coating or thin slurry.
- Cost splits into materials and labor: a DIY garage kit runs roughly $2-4 per sq ft in materials, while a pro job runs about $3-7 in materials plus $2-5 in labor, and metallic or commercial mortar systems cost far more.
- Click-and-roll DIY kits are realistic for a clean, dry, single-car garage; grinding a big slab, fixing high moisture, or coating a basement or stairs is where hiring a pro pays off.
- Polyaspartic cures and takes traffic faster and holds color in sunlight better than standard epoxy, but standard epoxy usually costs less per square foot.
Why the Concrete, Not the Epoxy, Decides How Long It Lasts
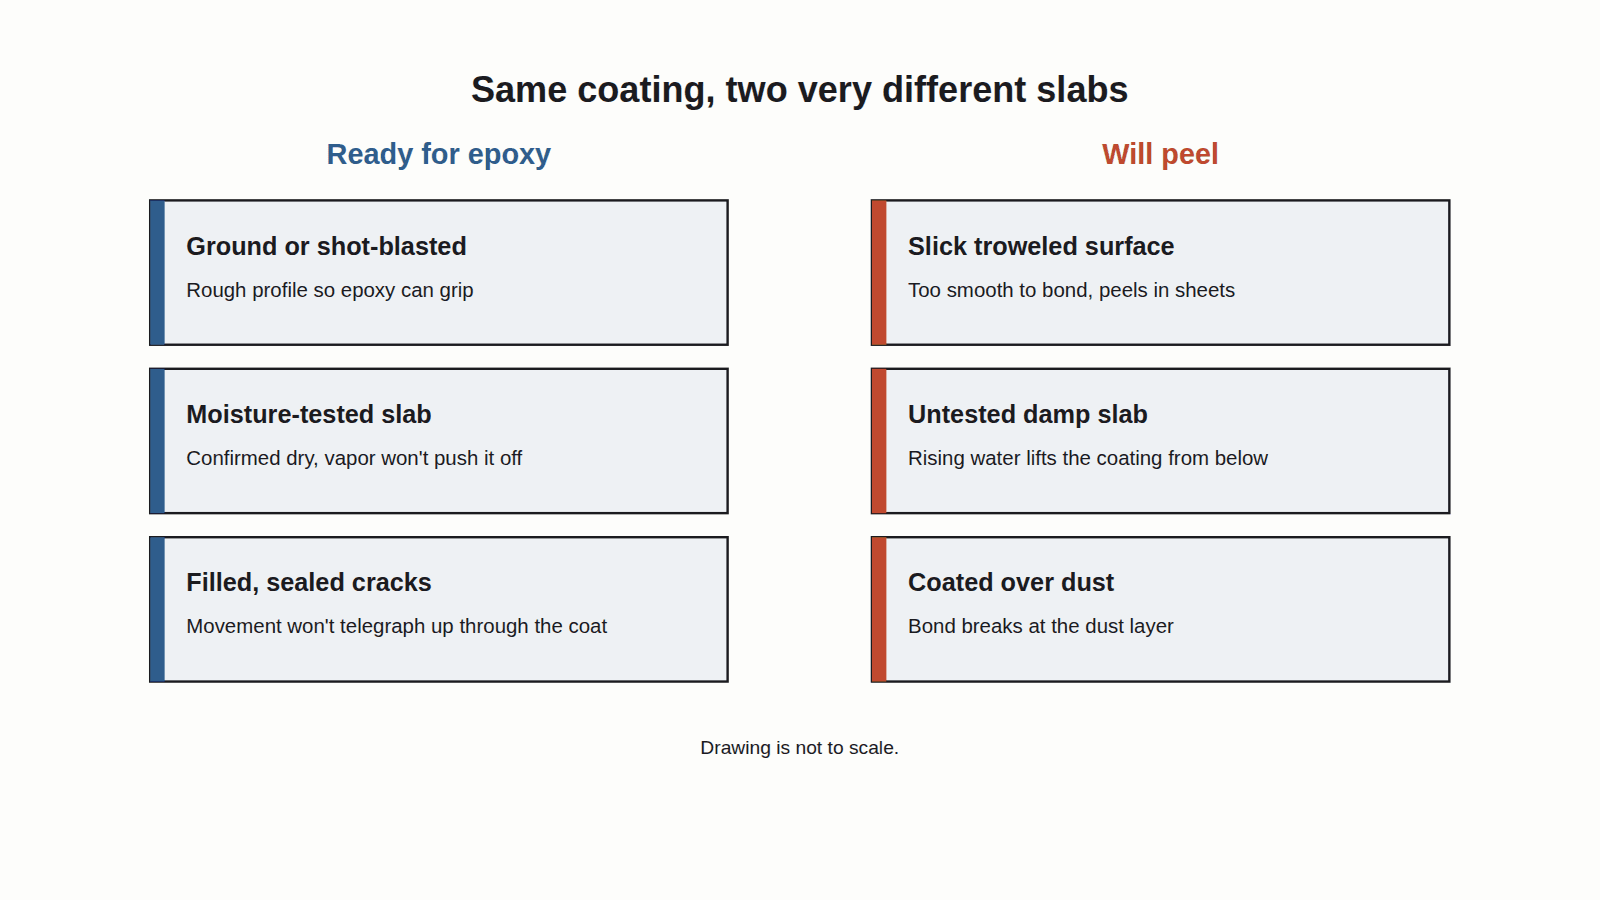
If your floor fails, look down, not at the bucket. Peeling sheets, hot-tire pickup (where warm tires grab the coating and pull it off), and lifting seams almost always begin at the slab, not in the resin.
When the prep is done right, that difference is measurable, not just anecdotal: a properly prepped, professionally installed epoxy floor typically lasts 10-20 years before it needs recoating, while a DIY coating done well on the same slab typically holds up for 1-5 years before it starts thinning or lifting at high-traffic spots, and far less than that if the moisture test, grinding, or crack repair was skipped.
Three checks matter before anything else.
First, flatness. A hump or dip you talk yourself into ignoring shows up later as a thin, worn spot.
Second, moisture. Water vapor rises up through concrete from the ground, and it pushes the coating off from below. A slab that feels bone-dry to your hand can still read wet to a moisture meter (a tool that measures how much water is in the concrete). A quick field version: tape a square of plastic to the slab overnight and check for droplets underneath in the morning.
Third, surface profile. Bare concrete is often too slick to grip. Pros rough it up by grinding (running a machine with abrasive disks over it) or shot-blasting (firing tiny steel beads at it) so the epoxy has teeth to bond to.
Here's the part nobody puts on the box: the manufacturer's warranty quietly hinges on all three. Skip them and the failure is yours, not theirs. On a garage job in Dayton, Ohio, the homeowner swore the slab was dry, it felt fine to the hand, but the moisture meter read wet underneath, and the coating peeled in sheets by that summer.
What an Epoxy Floor Actually Is
An epoxy floor is a two-part liquid, a resin plus a hardener, that you mix together. Once mixed, the two chemicals react and cure into a hard plastic layer bonded to the concrete.
That reaction is the key difference from paint. Paint dries as its water or solvent leaves. Epoxy doesn't dry, it chemically locks together into something tougher. That's why it grips the slab and shrugs off stains and many chemicals.
It suits bare concrete for a plain reason: it fills the pores, stops the fine gray dust that raw concrete sheds, and leaves a surface you can mop instead of sweep. That's also why it's meant for a bare slab rather than an existing floor covering — if you're wondering whether it'll bond over an old floating floor instead, installing epoxy over laminate flooring is a different situation with its own risks worth understanding first.
So an epoxy floor is really two liquids that become one hard skin fused to the concrete. It doesn't just sit on top like a coat of paint. And that bond is only as good as the surface it grabbed, which is why the last section came first.
What you actually get out of it depends on four things: how thick it goes, which resin type you pick, how well the slab was prepped, and who installs it. The rest of this guide walks each one.
Coatings, Slurries, and Mortars: The Three Thickness Systems
Epoxy systems split by how thick they build up, measured in mils (thousandths of an inch). Coatings are thinnest, slurries sit in the middle, and mortars are the thickest, up to 250 mils or more.
Worth a quick note here since the term causes mix-ups: the "epoxy mortar" described in this section is a floor-coating build-up system, not the same product as epoxy mortar used to set tile. According to the Tile Council of North America (TCNA), epoxy mortar meeting ANSI A118.3 is a chemical-resistant, water-cleanable tile-setting and grouting material, a distinct product from the floor-coating systems covered here.
Match the system to the room. A home garage or basement rarely needs more than a coating or a thin slurry (a thicker, self-leveling pour that smooths out minor roughness); if that self-leveling option is what you're weighing, the self-leveling epoxy cost breakdown prices it out room by room. Heavy mortar systems, troweled on like cement, are built for factory and warehouse abuse, not a place you park one car.
The failure to avoid is going too thin for the traffic. Under-build a busy floor and it wears through to concrete at the tire path. The trowel-heavy mortar systems are a crew job with big mixers and tight timing, not a weekend project.
If you're pricing a factory or shop slab, the thick systems get their own deep dive in the industrial epoxy flooring guide. The thin coating systems are where the cheapest per-square-foot pricing lives, and you can see how that math works in the epoxy floor coating cost per square foot breakdown.
| System | Typical thickness | Best for | Installer |
|---|---|---|---|
| Coating | roughly 4-20 mils | Home garages, basements, light traffic | DIY-friendly to pro |
| Slurry (self-leveling) | roughly 20-125 mils | Kitchens, showrooms, medium traffic | Usually pro |
| Mortar | up to 250+ mils | Factories, warehouses, heavy impact | Pro crew only |
Source: the epoxy manufacturer install guides I work from and my own jobs
Typical epoxy thickness systems by build-up, best use, and who usually installs them.
Epoxy vs Polyaspartic vs Polyurethane vs MMA
There's no single winner here, only tradeoffs. Polyaspartic cures fast and holds its color in sunlight. Standard epoxy usually costs the least. Polyurethane resists scuffs and sun. MMA (methyl methacrylate, another fast resin) cures even in the cold but smells strong while it's going down.
The big weak spot for standard epoxy is sunlight. It can yellow in direct sun and chalk outdoors, which is why sunrooms and patios usually get polyaspartic or a UV-stable topcoat over the epoxy instead.
Cure time is the other thing that changes your life. It decides how long before you can walk on the floor and how long before you can park on it. Faster cure means you get your garage back sooner, and it usually costs more.
Most homeowners I install for still choose standard epoxy with a topcoat. It's the cheapest way to a tough floor, and they can live with a day or two of downtime. The ones who pay up for polyaspartic are usually the ones who can't lose the garage for three days.
| Resin | Cure to traffic | UV stable | Relative cost | Note |
|---|---|---|---|---|
| Standard epoxy | roughly 24-72 hrs | No, can yellow | Lowest | The common garage baseline |
| Polyaspartic | roughly 4-24 hrs | Yes | Higher | Fast return, often a topcoat |
| Polyurethane | roughly 24-48 hrs | Yes | Higher | Scuff and UV resistant topcoat |
| MMA | roughly 1-2 hrs | Varies | High | Cures in cold, strong odor |
Source: product data sheets I install from plus my own jobs
How the four common floor resins compare on cure time, UV stability, and relative cost.
DIY Kit vs Hiring a Pro
Honest verdict: a click-and-roll DIY kit is realistic for a clean, dry, single-car garage. Grinding a large slab, fixing high moisture, coating a basement, or doing stairs is where a pro earns the fee.
The real gap between the two isn't the resin, it's the prep tooling. Pros grind or shot-blast the slab to open it up. Most kits lean on an acid etch, a mild acid wash meant to roughen the surface, and on a slick, hard-troweled slab that etch often leaves it too smooth to bond well.
The cost tradeoff is about who carries the risk. DIY saves you the labor line, but if the slab was never moisture-tested, you own the failure. A pro job costs more up front, and that price usually includes the grinding and the moisture check that protect it.
So hire out when the slab is large or open-plan with moisture transitions between areas, when a moisture test reads high or you have no way to test it, when the job includes stairs or a basement below grade (below the surrounding ground level, where dampness is common), or when you want a flake or metallic finish you can't afford to redo.
If you're weighing the two paths on price, the DIY garage floor cost breakdown and the full epoxy floor installation cost guide lay out each one.
How an Epoxy Floor Gets Installed, Step by Step
Start where failures start. The prep and the moisture test come first, always, before any primer touches the floor.
- Test moisture and check flatness. Run a meter or do the taped-plastic test, and straightedge the slab for humps and dips.
- Grind or shot-blast the surface to a rough profile so the coating can bite.
- Patch and seal cracks and low spots, then vacuum every trace of dust.
- Prime the bare, clean concrete so the base coat has something to lock into.
- Roll the base coat, working in the manufacturer's mixed batches and pot-life window (the short time before mixed epoxy starts to harden in the bucket).
- Broadcast flake or add color while the base is still wet, if you want that look.
- Seal it with a topcoat, and add a second topcoat for extra wear or a UV-stable finish.
The step the competitor pages skip is the wait between coats and the full cure before you park on it. Foot traffic comes first, then vehicle traffic days later. Rush a car onto it and you get hot-tire pickup, that peel where warm tires lift the fresh coating.
A metallic finish, where a tinted resin is swirled to look like poured stone, adds its own steps and skill, and it's covered in the metallic epoxy floor cost guide if that's the look you're after.
What an Epoxy Floor Costs: Materials vs Labor
Split every quote into materials and labor, because a single number hides where your money goes. As a rough frame, a DIY garage kit runs about $2-4 per square foot in materials. A pro job runs about $3-7 per square foot in materials plus roughly $2-5 per square foot in labor. Metallic finishes and commercial mortar systems cost well beyond that. For a closer breakdown of these numbers, the epoxy floor cost per square foot guide walks through each price range in more detail.
Two things push the labor number up. Grinding a big or badly cured slab takes machine time. Fixing high moisture with a special barrier coat adds a whole extra material and step. Both are prep, and both are why identical-looking garages get different quotes.
Room and layout matter too. A basement below grade costs more than an open garage because the moisture risk is higher and the barrier prep is often needed. Stairs cost more per square foot than a flat slab because every tread is slow hand-work.
For a plain-English rundown of what drives the number on a home, the residential epoxy cost guide and the wider epoxy floor price guide are the useful next reads, since they price each room and finish type instead of quoting one national average.