
When Homeowners weighing rubber plank for a sunroom or another wet-prone room have often already bought into its soft, no-slip pitch without weighing the price gap or the rubber-not-wood look. Pick the wrong room or install method and you pay for that floor twice. Here are the eight things I walk them through before they open a box.
Key takeaways
- Rubber plank clicks or glues down like LVP but is solid rubber, so it soaks up impact and sound LVP can't; LVP still wins on realistic wood looks and lower material cost.
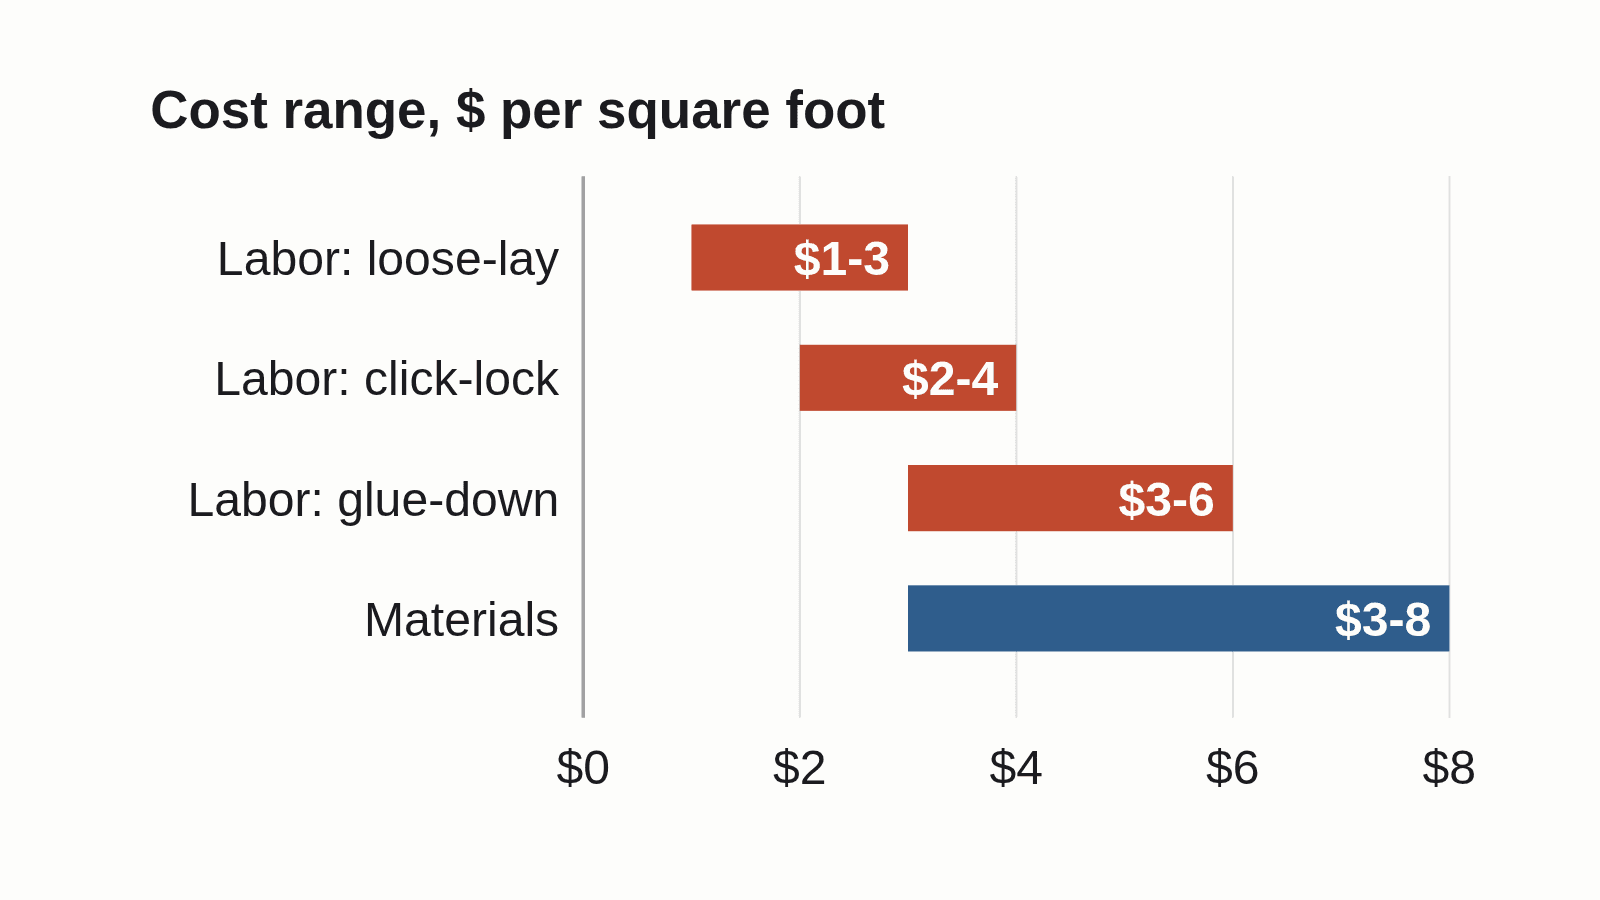
- Budget roughly $3-8 per sq ft for materials plus $2-6 per sq ft for labor, and expect basement and stair jobs to run higher than an open room.
- Click-lock and loose-lay are realistic DIY; glue-down across a full room is where hiring a pro usually pays off.
- Check subfloor flatness and moisture before laying a single plank; rubber's warranty quietly hinges on the prep, not the plank.
- No plank is truly waterproof at the seams; a solid rubber core shrugs off water, but click joints and glue-down edges are where it gets in.
1. What Rubber Plank Flooring Actually Is (and How It Differs From Tile and Sheet)
Rubber plank flooring is long, narrow, solid-rubber boards built to mimic the shape and layout of luxury vinyl plank. Unlike a printed vinyl plank, there's no thin picture layer on top. It's rubber the whole way through, usually recycled crumb rubber or EPDM, a synthetic rubber prized for weather and wear resistance.
That solid build is why it wears differently than most floors. A scratch on printed LVP cuts through the image; a scratch on rubber is the same color underneath, so it hides scuffs better.
Plank isn't the only format. You also get square tiles and wide rolled sheet, and each has a job. Plank gives you fewer seams than tile and a cleaner LVP-style look. Tile lets you pull and swap a single square if one gets damaged, and if you like a raised-pattern look, rubber coin flooring is a common tile and roll option worth knowing about. Sheet lays down with the fewest joints of all but is the hardest to patch. That sheet format matters enough industry-wide that ASTM International currently has a work item (WK92410) in development to create a formal standard for thermoplastic rubber sheet flooring without backing, a sign the category is being taken seriously enough to warrant its own spec, even though that standard isn't finalized yet.
If you're weighing formats before you commit, the broader rubber flooring format overview walks through all three, and if you're leaning toward squares, Rubber tiles for home covers that route in detail.
| Format | Seams | Single-piece swap | Best for | Typical install |
|---|---|---|---|---|
| Plank | Moderate (long edges) | Easy | LVP-look living areas, hallways | Click-lock or glue-down |
| Tile | Most seams | Easiest (one tile) | Basement gyms, spaces that may flood | Interlocking or loose-lay |
| Sheet/roll | Fewest seams | Hardest (cut-in patch) | Large open floors needing few joints | Glue-down |
Source: measured off the plank, tile, and roll stock I keep on the truck
Note: format comparison based on manufacturer specs and hands-on installation experience across plank, tile, and roll products.
How the three rubber formats compare on seams, single-piece swaps, and the rooms each one suits.
2. Rubber Plank vs. LVP: The Tradeoff That Actually Matters
Here's the tradeoff: LVP gives you a more realistic wood look and a lower material price. Rubber plank gives you impact absorption, sound-deadening, and slip grip that vinyl can't match. Neither is better across the board. You pick by the room and how much abuse the floor takes.
People hear "solid rubber core" and assume the whole floor is waterproof. On a product like nora's Noraplan rubber plank, the solid core really does shrug off surface water. But the seams and edges are still the weak point, exactly like LVP. Click joints and glue-down edges are where water sneaks in, sits, and causes trouble. A waterproof core does not mean waterproof seams, and the failures I get called back for happen at the joint, not the surface.
Where each one fails is telling. On tear-outs I've handled, dropped weight and heavy point loads have dented LVP and telegraphed the subfloor right through it. Rubber shrugs that off. But rubber has its own downsides: fresh recycled rubber can carry an odor until it airs out, and it looks like rubber, not oak. If you want a floor that reads as real hardwood, rubber isn't it.
| Factor | Rubber plank | LVP |
|---|---|---|
| Realistic wood look | Weak | Strong |
| Impact / sound absorption | Strong | Weak |
| Slip grip underfoot | Strong | Moderate |
| Material cost | Higher | Lower |
| Seam water resistance | Edges vulnerable | Edges vulnerable |
| New-floor odor | Possible, airs out | Minimal |
Source: from tearing out both and seeing which floors dented and which seams let water through
Where rubber plank and LVP each win and lose, factor by factor.
3. What Rubber Plank Actually Costs (Materials vs. Labor)
Budget roughly $3-8 per square foot for materials and $2-6 per square foot for labor, depending on the install method. Solid rubber costs more than budget vinyl, so the material line is where rubber plank pulls ahead of LVP on price. If you're comparing formats, this rubber tile price worksheet by use case breaks the same cost factors down for tile instead of plank.
Labor is where the room does the talking. A wide-open room in click-lock is the cheapest to install. Glue-down, stairs, and basements run higher. Slab prep on a basement floor takes time, and cut-heavy rooms eat hours. I used to quote a flat rate per square foot until a job full of closets, doorways, and a bay window ate a whole extra day. Now I count the cut-heavy areas separately, because the open middle of a room is never where the time goes.
The arithmetic is simple: area times (materials plus labor). Measure length by width, add 5-10% for waste and cuts, then multiply by your combined per-foot rate.
| Variable | Example | Note |
|---|---|---|
| Floor area | 200 sq ft | measure length x width, add 5-10% waste |
| Materials | $3-8 / sq ft | solid rubber costs more than budget LVP |
| Labor | see method breakdown below | click-lock, glue-down, and basement/stairs each run different rates |
| Worked total (200 sq ft, click-lock, mid materials) | 200 x ($5 + $3) = $1,600 | materials $1,000 + labor $600 |
Source: the materials-and-labor split I write into my own rubber plank bids
A worked 200-square-foot example showing how area, materials, and labor combine into one job total.
Here's how the labor methods and the material range stack up side by side:
| Cost item | Low ($/sq ft) | High ($/sq ft) |
|---|---|---|
| Labor: loose-lay | 1.00 | 3.00 |
| Labor: click-lock | 2.00 | 4.00 |
| Labor: glue-down | 3.00 | 6.00 |
| Materials | 3.00 | 8.00 |
For a deeper line-by-line breakdown, the dedicated rubber flooring installation cost guide runs the numbers by method and room.
4. Subfloor Flatness and Moisture Come First
Before a single plank goes down, check the subfloor for flatness and test it for moisture. On the floating floors I install, the finished job only lasts as long as the prep beneath it, and the maker's warranty hinges on that prep, not on the plank you picked. That same principle carries outdoors too — if you're covering a patio, deck, or garage floor instead of an interior room, this guide on matching rubber interlocking tiles to your outdoor surface walks through picking the right tile for each surface type.
Skip it and the floor tells on you. High spots telegraph through and you feel every bump underfoot. Hollows let click joints flex and pop apart over time. And trapped slab moisture is the one that voids warranties, because rubber over a wet slab traps that water with nowhere to go. The same base-prep logic carries outdoors, too — before you assume a paver can just sit on soil, this guide on putting rubber pavers directly on dirt walks through when that works and when you actually need a base.
The order is simple. Clean the subfloor, then grind down high spots and fill the low ones so it's flat. Lay a straightedge across the floor first to find the bumps and dips before you fix anything.
Once it's flat, test moisture before you lay a single plank. On concrete, use a moisture meter, a tool that reads how wet the slab is, before you trust it.
Concrete never dries perfectly on a schedule, so test it, don't assume. A dry-looking slab can still read wet inside.
5. Install Method Sets the Difficulty
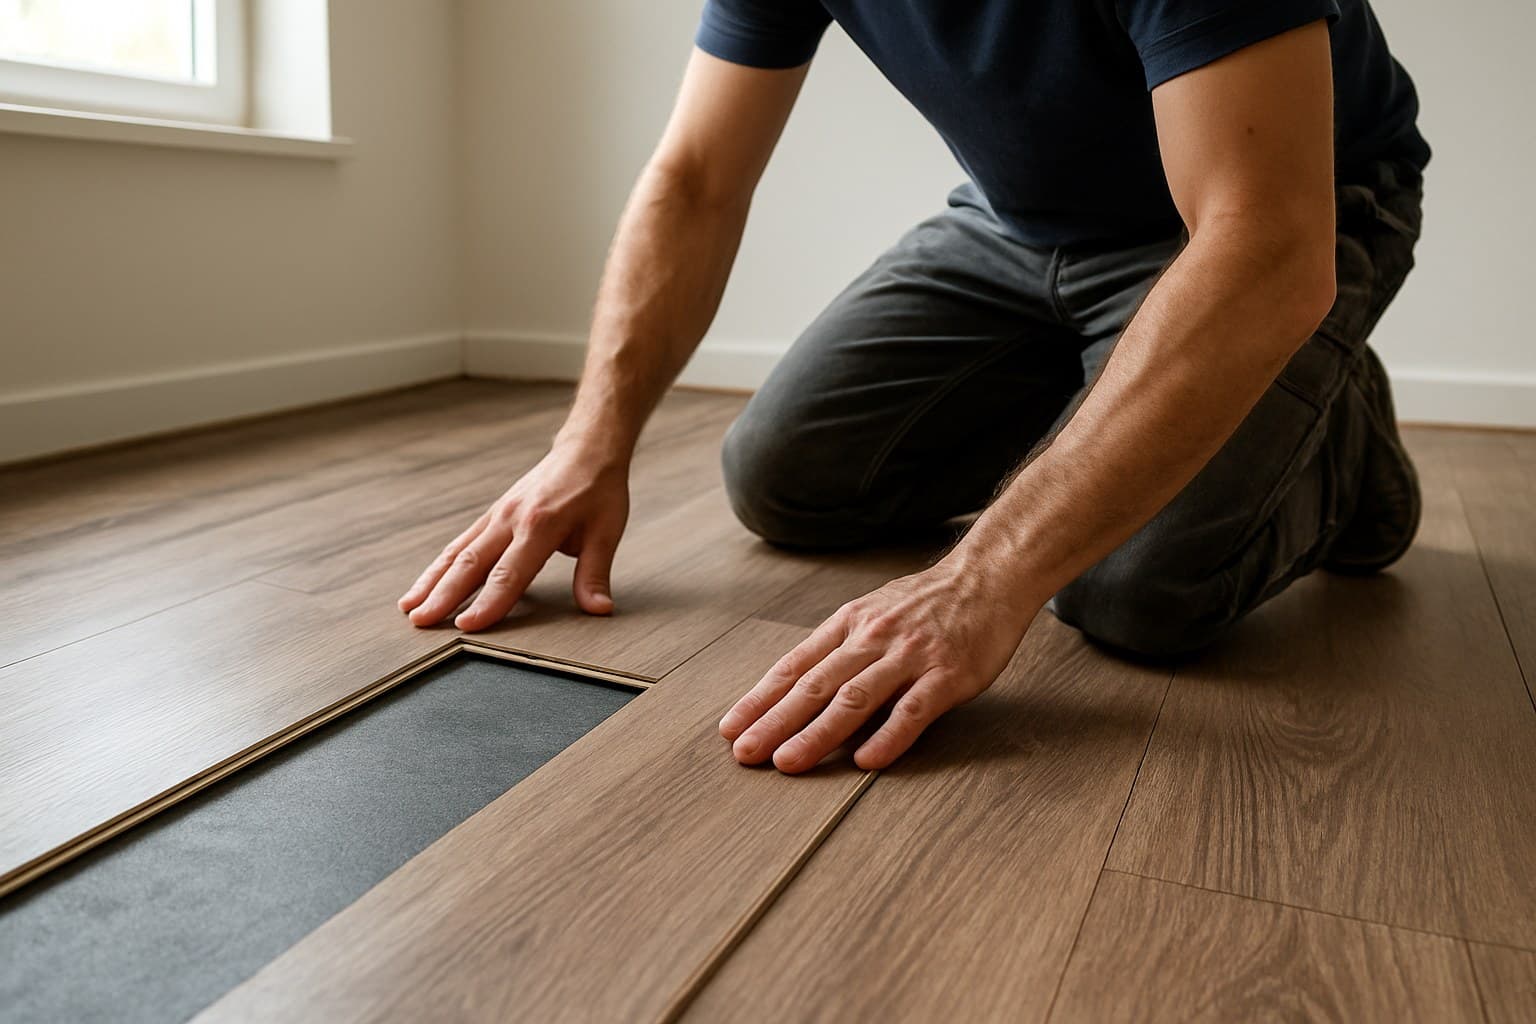
The install method decides how hard the job is more than the plank does. There are three ways rubber plank goes down. Click-lock snaps edge to edge and floats over the subfloor, held in place by its own weight and the locked joints. Loose-lay planks are heavy enough to sit flat without adhesive, set tight against each other. Glue-down uses troweled adhesive and is permanent, the strongest bond and the biggest commitment.
Click-lock and loose-lay are realistic DIY for most homeowners. Glue-down across a full room is where hiring out usually pays off, because a bad trowel job or a rushed edge shows up fast and is a nightmare to redo.
On any floating install, leave an expansion gap around the whole perimeter so the floor can move with temperature. The exact size is set by the maker's own instructions, not a number you carry from the last job. Look it up on the product's install sheet every time.
A good click joint sits tight with no gap, so the surface reads as one continuous line. A gapped joint is the opening water uses to get under the floor, so if a seam won't close, stop and fix the reason instead of forcing the next plank.
6. The Downsides Worth Knowing Upfront
Rubber plank has real cons, and they're worth knowing before you buy, not after. It looks like rubber, not wood, so it never passes for oak or walnut no matter how it's finished. New recycled rubber can smell for a few days until it airs out, and it costs more per square foot than budget LVP.
The seam and edge water vulnerability is back here too. The core shrugs off water, but joints and glued edges are where it gets in. Some products also stain or react badly to certain cleaners, so check the maker's care sheet before you reach for a strong cleaner.
Softer rubber can dent under narrow furniture legs, so use wide floor protectors under heavy pieces. And a heavy glued-down install is a real chore to remove later, which matters if you think you'll change the floor in a few years.
None of these are deal-breakers for the right room. They're tradeoffs. In a gym, a mudroom, or a laundry, that grip and quiet earn the downsides. In a formal living room where you want wood, they don't.
7. Which Rooms Rubber Plank Actually Earns Its Keep
Rubber plank earns its keep anywhere impact, noise, and slip matter more than a wood look. That's home gyms, playrooms, mudrooms, laundries, and basements that see hard use. For actual outdoor play areas rather than an indoor playroom, though, you want dedicated heavy duty outdoor rubber mats built for playgrounds, since those are rated for fall-height safety standards that plank flooring isn't designed to meet.
A basement is a strong fit because the slab is never perfectly dry and rubber tolerates that better than most floors, as long as you test the moisture first. For a basement gym I actually lean toward interlocking tiles over plank, because if one gets damaged or the room floods, you pull and replace a single tile instead of tearing up a glued floor, and the rubber tile cost breakdown by room size lays out what that tile route runs across 100, 300, and 500 square foot rooms. If your basement is a workout space, the rubber flooring for a home gym guide breaks down thickness by how much weight you drop.
Bathrooms are a common wet-room ask, and the verdict there is mixed rather than a clean yes. A half-bath or powder room away from direct shower or tub splash can work fine with rubber plank, especially click-lock over a flat, dry subfloor. A full bath with a tub or shower is a harder sell: the seam and edge vulnerability covered above is exactly what standing water at a shower threshold or around a toilet flange exploits, and plank doesn't offer the sealed, continuous-seam options that sheet goods or well-grouted tile can in that spot. If you want rubber underfoot in a full bath, look at rubber tile with sealed edges, or ask the manufacturer about a wet-area installation method, before committing to click-lock plank there. The same water-exposure logic carries over to exterior spaces, and this outdoor rubber tile material and climate guide is worth a look if you're weighing a patio or porch instead of a bathroom.
Where rubber plank doesn't earn its keep is a formal living room, dining room, or anywhere you want the floor to read as real hardwood. There, LVP or actual wood wins, and the money you'd spend on rubber's grip and cushion is wasted on a room that never needed it.
8. Should You DIY It or Hire It Out?
DIY it if you're laying click-lock or loose-lay in a fairly open room. Both go down without adhesive, both are forgiving, and a careful homeowner can get a clean result over a weekend. Do your flatness and moisture checks first, leave the perimeter gap the install sheet calls for, and you're in good shape.
Hire it out for glue-down across a full room, for stairs, and for large open-plan floors with moisture transitions between rooms. Troweled adhesive is unforgiving, stairs are all precise cuts and wrapped edges, and moisture transitions need judgment about where and how the floor should break. Those are the jobs where a pro's day saves you a redo.
The middle ground is a small glue-down space, like a laundry or a mudroom. If you're handy and patient, it's doable. If the thought of spreading adhesive evenly worries you, that worry is worth a quote.