
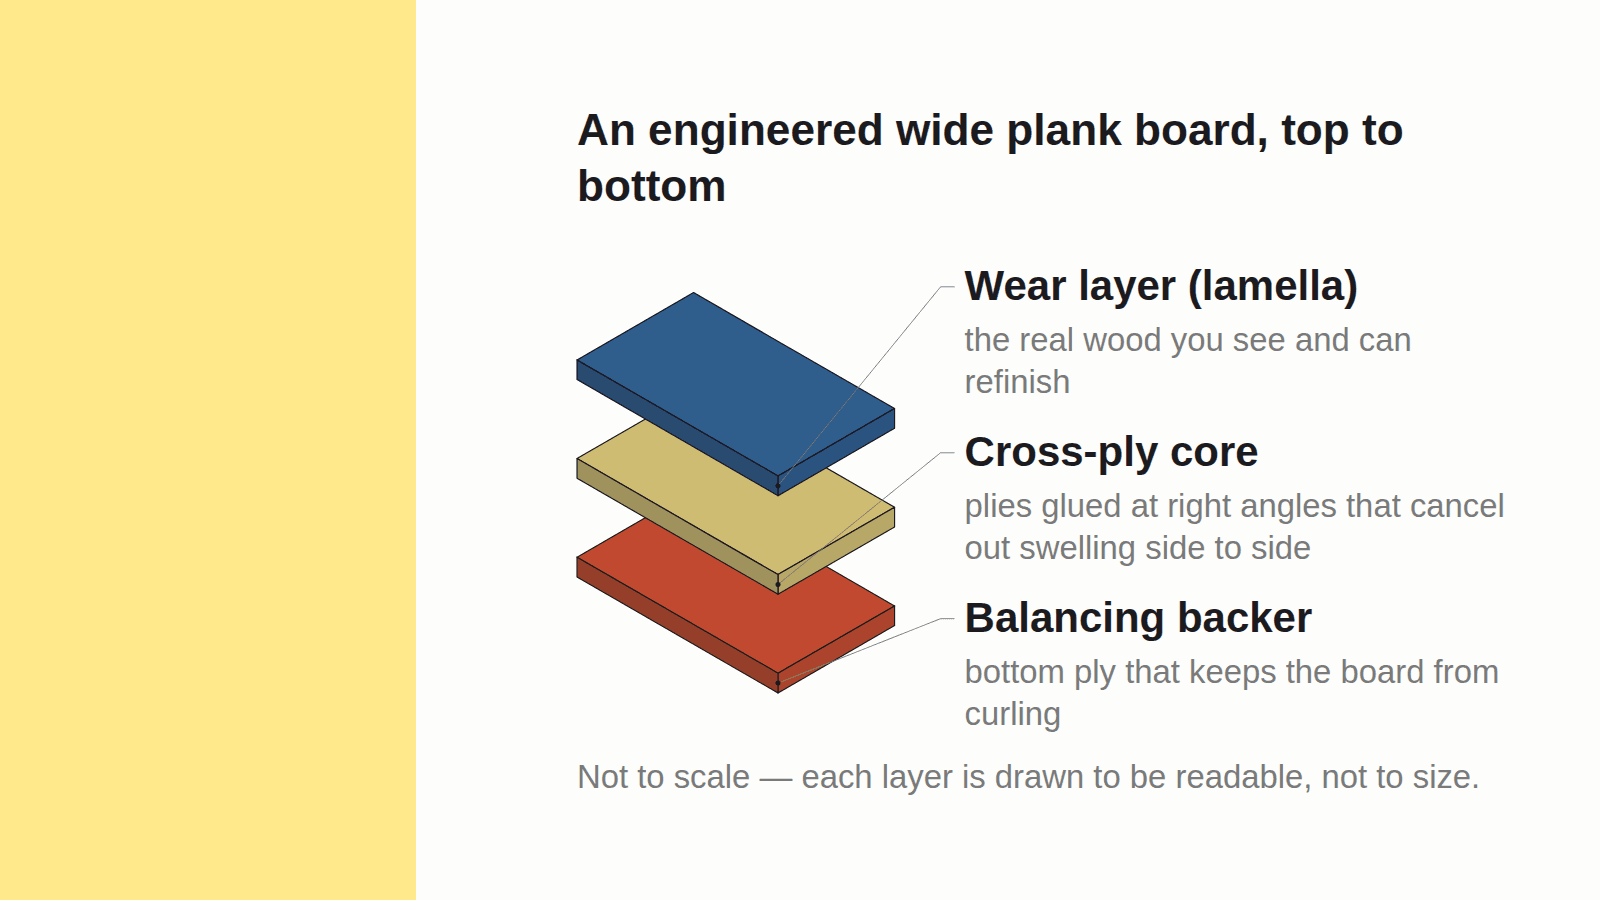
When the Hendersons in Portland asked for 9-inch wide plank engineered oak in their living room, the first question out of their mouths was whether the boards would gap open the first dry winter. With wide plank engineered hardwood, width, veneer thickness, and subfloor prep all pull in different directions. Get one wrong and the floor tells on you. The same questions come up just as often when the species on the order is brazilian cherry, which moves and colors differently enough that it deserves its own brazilian cherry engineered hardwood checklist before you sign off.
Key takeaways
- Engineered wide plank resists gapping, cupping, and warping far better than solid because its cross-ply core cancels the seasonal swelling that wide solid boards can't fight; the wider the board, the more that matters.
- "Wide plank" starts around 5 inches; "extra wide" runs roughly 7-12 inches. Width alone isn't quality, a 9-inch board with a thin veneer is still a cheap floor.
- Costs split by tier: materials run about $3-28 per sq ft, install labor adds roughly $3-9 per sq ft, and basement or stair jobs cost more than open rooms.
- Refinishing depends on wear-layer thickness; the NWFA Engineered Wood Flooring Refinishable Program certifies lines with enough veneer to sand, and the product's EPD cites a 75-year service life.
- Below grade, solid wood is a no per NWFA, so engineered is the safe pick for basements and radiant heat. Most failures happen at seams and edges from bad prep, not the plank face.
Will Wide Planks Gap, Cup, or Warp? Start Here
Straight answer: engineered wide plank is far less likely to gap, cup, or warp than solid wood. Its core is built from thin wood plies glued at right angles to each other, and that layering cancels out most of the side-to-side swelling a wide solid board can't fight. The movement isn't zero, but it's controlled. If you're still deciding between solid and engineered altogether, this guide to solid vs engineered hardwood breaks down species choices room by room.
Width is the whole story here. The wider a solid board, the more it expands and shrinks across its face when the seasons change. A 3-inch strip can hide that movement; a 9-inch plank can't. Width is exactly where engineered earns its keep.
When wide floors do fail, it's almost never the plank face. It's the seams and edges, and it traces back to a subfloor that wasn't flat or moisture that never got checked. No wood floor is truly "no movement." You manage it with the right construction plus real prep, not by hoping.
What Counts as 'Wide Plank' (And Who's Stretching It)
Most of the trade calls anything 5 inches and up "wide plank." "Extra wide" runs roughly 7 to 12 inches, and a lot of mills top out around 12 inches. So if a board is 6 inches, it qualifies, even though it's a long way from the 10-inch planks in the glossy photos. If you're shopping right at that upper ceiling, it's worth checking the 12 inch wide engineered hardwood specifics before you order, since boards that size behave differently than anything smaller.
That 5-inch line isn't an industry standard, though, it's just a common convention, and manufacturers don't apply it consistently. Some suppliers hang the "wide plank" label on anything at or above that 5-inch mark, while others hold the term back until a board clears a wider minimum of their own choosing. Two floors both marketed as "wide plank" can start from different actual widths depending on whose spec sheet you're reading, so the label tells you less than the measurement printed next to it. That same inconsistency is exactly how a real discount engineered hardwood bargain gets confused with a floor that's simply been downgraded, so it pays to check the specs yourself before a deal looks too good to pass up.
When a spec sheet promises engineered hardwood in wide plank widths, remember the number on the label is just width. It says nothing about quality.
A 9-inch board with a paper-thin veneer is still a cheap floor. Check the wear layer, the real-wood top you actually walk on and refinish, before you fall for the width. Wider boards give you fewer seams and a calmer, more open look, but they also show more movement if the prep gets skipped.
Solid vs Engineered Wide Plank: Which Fits Your Home
For wide widths, engineered wins on stability, and the specs below settle the rest. The National Wood Flooring Association (NWFA) does not recommend solid wood below grade, so engineered is the pick for basements, concrete slabs, and radiant heat.
Don't read engineered as the lesser choice. Per the NWFA's official definition of real wood flooring, engineered wood built with a genuine hardwood veneer counts as real wood flooring too, and a well-made one reads as hardwood at resale. You're matching construction to the room, not compromising on "real."
| Factor | Solid | Engineered |
|---|---|---|
| Stability in wide widths | Lower; moves most when wide | High; cross-ply core resists cupping |
| Below grade / basement | Not recommended (NWFA) | Yes, common choice |
| Over radiant heat | Risky, limited | Generally yes, per product sheet |
| Refinishing | Several sands over its life | Limited; depends on wear-layer thickness |
| Moisture at seams/edges | Poor | Better, but seams still fail first if prep is bad |
| Counts as "real wood"? | Yes | Yes, per NWFA |
Source: NWFA installation guidelines, which do not recommend solid wood below grade
How solid and engineered wide plank compare on the specs that actually decide the job.
If you're eyeing a wet room where you'd even weigh a plastic floor instead, compare the two honestly in this engineered hardwood vs LVP breakdown before you commit.
What Wide Plank Engineered Really Costs
There's no single national number, so split every figure into materials versus labor. Budget lines start low. Premium unfinished wide plank, like Vermont Plank Flooring's, runs about $12 to $28 per square foot for material alone, plus roughly $2 more finish-ready or $6 more prefinished. Labor sits on top of that, and basement or stair jobs cost more than open rooms because of the extra cuts, transitions, and moisture control.
| Tier | Material ($/sq ft) | Labor ($/sq ft) | Installed total |
|---|---|---|---|
| Budget | $3-6 | $3-5 | $6-11 |
| Mid | $6-12 | $4-7 | $10-19 |
| Premium (wide, unfinished) | $12-28 | $5-9 | $17-37 |
| Add-ons | Prefinished +$6; finish-ready +$2 | Basement/stairs add to labor | Varies by room |
Source: Vermont Plank Flooring's published unfinished pricing, with install labor from my own jobs
Per-square-foot cost for wide plank engineered by tier, materials and labor shown separately.
Do the math yourself: room total = (material per sq ft + labor per sq ft) x square footage. A 300 sq ft mid-tier room at $8 material plus $5 labor lands near $3,900 installed.
I used to quote a flat rate per square foot until a remodel for the Alvarez family in Denver, full of closets, doorways, and a bay window, ate a whole extra day. Now I count the cut-heavy spots separately, because the open middle of a room is never where the time goes. That's where labor hides on a wide plank job.
Durability, Refinishing, and How Long It Lasts
How long you keep this floor comes down to the wear layer. A thin veneer means you can only screen-and-recoat, a light buff and fresh finish, not a full sanding to erase deep gouges. A thicker veneer buys you real sands down the road.
The NWFA's Engineered Wood Flooring Refinishable Program certifies lines with enough veneer thickness to actually be sanded and refinished, not just screened and recoated. That's a real spec to ask for, not marketing. If you're comparing lines on veneer and build quality, this rundown of the best engineered hardwood brands ranked by the numbers is a good next stop.
On lifespan, according to the NWFA's Environmental Product Declaration (EPD) for engineered wood flooring, a standardized product sheet written under ISO (International Organization for Standardization) 21930 rules, the product's functional unit is based on a 75-year service life. The floor lasts as long as its veneer and the prep beneath it, no longer. For air quality, look for CARB 2 compliance, California's limit on formaldehyde in the core glues, the standard for a low-emission engineered floor.
I once refinished a homeowner's solid oak floor in Tacoma for the fourth or fifth time, and it sanded down to the tongue in one corner before I caught it. That's the lesson for engineered too: the veneer is a budget you spend once, so know how thick it is before you buy.
Installing Without the Gaps and Cupping
Before a single plank goes down, check subfloor flatness and run a moisture meter, a tool that reads how wet the subfloor is, on both slab and wood subfloors. This is where gapping and cupping are won or lost, not on the day you snap the boards together.
Acclimation is per the box, not a rule of thumb. NWFA's installation guidelines direct installers to follow the manufacturer's written instructions rather than a blanket day count, some lines want days on site, some say none at all, so follow that product's own sheet instead of advice you read online.
Leave the expansion gap the maker specifies around the whole perimeter so the floor can move without buckling. The exact size is a spec you look up, not a universal number.
Underlayment is the other half of the moisture-control story, and it's easy to skip. Over a concrete slab, a vapor or moisture barrier pad goes down first to block slab moisture from wicking up into the wood; over a wood subfloor with a floating click-lock install, a foam pad cushions the joints and adds sound deadening instead. Skipping the barrier on a slab is one of the faster ways to void a warranty and set up cupping later. At the walls and doorways, transition moldings, reducers, T-molds, thresholds, are what actually cover the expansion gap you left around the perimeter, letting the floor move without leaving a visible seam or a trip hazard where rooms meet. For rooms where moisture is more than an install-day concern, like bathrooms or mudrooms, it's worth exploring this waterproof engineered hardwood flooring guide instead.
DIY versus hire, straight: click-lock engineered is realistic for a handy DIYer in an open room. Glue-down, stairs, and large open-plan moisture transitions are where hiring out pays for itself.